
_BestEstimatedROI_Roi.png)
_BestSupport_QualityOfSupport.png)


Accessing your reminders
Your reminders can always be accessed from the Templates tab.
1. Navigate to NexHealth Home
2. Select Templates.

3. Click Reminders. This will open your Reminders sequence. Here, you will see gray tiles indicating when the messages are sent, with purple message tiles beneath to show you the messages.

Editing Messaging
NexHealth templates are fully customizable in your no-code editor.
1. To edit the messages, click to edit on any of the message tiles to edit the copy.

2. When editing the text of your reminders, be sure to leave in the INSERTCONFIRMAPPT smart command if you want to allow patients to confirm their appointments from that message. Optionally, you can add forms as well Click Forms under Smart Commands and choose the one you need.

3. Click Load preview to see the message from the patient perspective.
4. After review, click to close the preview and Save the message.
To add more messages
1. To add additional triggers to send more messages to the patient, click the plus icon in the sequence.

2. Select Add new action and enter when you would like the message to send: ex: Send messages before 1 day--this will send a reminder to patients the day before their appointment.
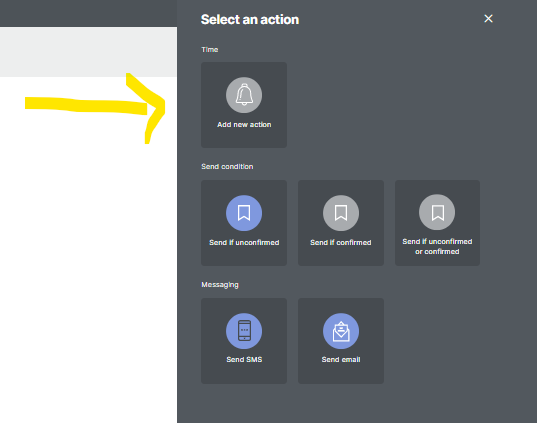
Send reminders by patient confirmation statuses
You can set separate messaging for patients based on their confirmation status (ex: only sending day-of reminders to patients who have confirmed or adding a disclaimer about your no-show policy for patients who have not confirmed.
1. Select +Add additional sequence.

2. This will open the action window. Choose:
- Send if confirmed: to send a message specifically for patients who have not confirmed their appointment.
- Send if confirmed: to send a message specifically for patients who have confirmed their appointment. This will work for appointments confirmed with NexHealth, or patients confirmed in your health record system
- Send if confirmed or confirmed: to send the same message to patients regardless of their confirmation status.
3. If you have separate messages based on confirmation status, you will see a fork in the sequence, as seen below. You can then edit the messages independently.

And I've used at least 6 others." - Shaye, Falmouth Dentistry